

Open Source Software
| Binaries/Code | Datasets | Open Source Software |
| libsvmtl | ImageJ-Plugins | XuvTools | Presto-Box | iRoCS | U-Net |
U-Net – Deep Learning for Cell Counting, Detection, and Morphometry
Please cite our Nature Methods paper when using resources from this page
| Thorsten Falk, Dominic Mai, Robert Bensch, Özgün Çiçek, Ahmed Abdulkadir, Yassine Marrakchi, Anton Böhm, J. Deubner, Z. Jäckel, K. Seiwald, A. Dovzhenko, O. Tietz, C. Dal Bosco, S. Walsh, D. Saltukoglu, T. Tay, M. Prinz, K. Palme, M. Simons, I. Diester, Thomas Brox & Olaf Ronneberger. U-Net Deep Learning for Cell Counting, Detection, and Morphometry. Nature Methods, 16, 67-70, 2019 |  Publisher's Link Publisher's Link
|
Previous work and corresponding project pages
- 2D U-Net (MICCAI 2015)
Olaf Ronneberger, Philipp Fischer & Thomas Brox. U-Net: Convolutional Networks for Biomedical Image Segmentation. Medical Image Computing and Computer-Assisted Intervention (MICCAI), Springer, LNCS, Vol.9351, 234--241, 2015 Publisher's Link
 Code
Code
- 3D U-Net (MICCAI 2016)
Özgün Çiçek, Ahmed Abdulkadir, S. Lienkamp, Thomas Brox & Olaf Ronneberger. 3D U-Net: Learning Dense Volumetric Segmentation from Sparse Annotation. Medical Image Computing and Computer-Assisted Intervention (MICCAI), Springer, LNCS, Vol.9901, 424--432, Oct 2016  Publisher's Link
Code
Publisher's Link
Code
Videotutorials
Segmentation
Finetuning
Detection
| Installation | Segmentation | Finetuning | Detection |
|---|---|---|---|
|
|

|
|
Important Notes and Disclaimer
All code is provided as is and without any warranty of functionality or fitness for a given task.
The framework is based on caffe (http://bvlc.eecs.berkeley.edu). The caffe framework can run entirely on the CPU or use GPU acceleration. If available, it is highly recommended to use GPU acceleration. By using GPU acceleration the computation times are drastically reduced by a factor of 20-100 (i.e. computations take minutes instead of hours).
Please file bug reports to github.com/lmb-freiburg/Unet-Segmentation/issues including information about your system and hardware.
U-Net Downloads
Software (most recent)
| Filename | Description | Size |
|---|---|---|
| caffe_unet_99bd99_20190109.patch | Patch file for https://github.com/BVLC/caffe.git commit 99bd99795dcdf0b1d3086a8d67ab1782a8a08383 Use this patch to build caffe_unet from source (Tested on Ubuntu 18.04 with CUDA 10 and cuDNN 7, Remark: Building for CUDA 10 requires CMake >3.12.2) | 867kB |

Check github/lmb-freiburg/Unet-Segmentation for the latest version of the Fiji U-Net Segmentation plugin.
Software (at time of publication)
| Filename | Description | Size |
|---|---|---|
| caffe_unet.patch | Patch file for https://github.com/BVLC/caffe.git commit d1208dbf313698de9ef70b3362c89cfddb51c520 Use this patch to build caffe_unet from source (Tested on Ubuntu 16.04/18.04 with CUDA 8/9 and cuDNN 6/7 | 822kB |
| caffe_unet_package_16.04_cpu.zip | caffe_unet and matlab interface (binary version) without GPU support Requires: libstdc++.so.6 | 26MB |
| caffe_unet_package_16.04_gpu_no_cuDNN.zip | caffe_unet and matlab interface (binary version) without cuDNN Requires: libstdc++.so.6, cuda-8 | 19MB |
| caffe_unet_package_16.04_gpu_cuDNN.zip | caffe_unet and matlab interface (binary version) with cuDNN Requires: libstdc++.so.6, cuda-8, cudnn-7 | 19MB |
| Unet_Segmentation.jar | Fiji U-Net segmentation plugin (revision 20181112152803). We highly recommend to use the Fiji Updater and install the most recent version of the plugin instead. Dependencies: jhdf5, jsch and protobuf | 1.3MB |
Data
| Filename | Description | Size |
|---|---|---|
| 2d_cell_net_v0_model.zip | The pre-trained 2D model for cell segmentation for caffe_unet | 111MB |
| 3d_cell_net_v1_models.zip | The pre-trained 3D model for microspore segmentation in structured illumination fluorescence and brightfield images for caffe_unet | 159MB |
| snemi_unet_models.zip | The pre-trained 3D model for neurite segmentation trained on the SNEMI training stack. The zip file contains the three training snapshots used to obtain the Figures of our NMeth paper. | 235MB |
| sampledata.zip | Sample images for testing the U-Net Segmentation plugin | 249MB |
Content
- Installation
- Prerequisites
- Backend (Server) Setup
- Setup on Amazon Elastic Compute Cloud (EC2)
- Setup on own Server (using pre-built binaries)
- Setup on own Server (from source)
- Frontend (Client) Setup
- Using the FiJi U-Net Segmentation plugin with the pretrained 2D network for cell segmentation
- Troubleshooting
Installation Instructions
Prerequisites
You need a computer for runnning the backend (caffe_unet) and a computer for running the frontend (ImageJ with our U-Net plugin). You can run the frontend on the same computer as the backend if desired.
Backend (Server) requirements:
- Ubuntu Linux (16.04 recommended to use binary distribution)
- (optional) NVIDIA GPU (e.g. TitanX, GTX1080, GTX980 or similar) for faster runtimes; Requires CUDA 8.0 (Additionally cuDNN 6 or 7 is recommended for large tiles esp. in 3D)
- (optional) Mathworks MATLAB (TM) R2015a or newer for measuring GPU memory
Frontend (Client) requirements:
- Linux, Windows or MacOS (requires Java 8)
Backend (caffe_unet) Setup
Setup on Amazon Elastic Compute Cloud (EC2)
This option is well suited to test-drive U-Net for your specific images as it allows to make predictions with a minimal financial (about one USD) and minimal time (about one hour) investment, while fully benefiting from GPU accelerated code execution.
The proposed setup is reasonably safe. The authentication happens through an RSA key and communication between your local client PC and the AWS cloud instance is encrypted. However, be aware that you will transmit your images to an external location, possibly located outside your country. Be sure to comply with your organizational data storage rules.
The Amazon Machine Image (AMI) that includes the operating system and additional software is provided by Amazon. Note, that with the proposed procedure you are at no point required to enter a password, except to access the Amazon AWS web page.
Setup Amazon AWS
Setting up an AWS account requires a valid credit card and a callable phone number. The cloud instances (i.e. the virtual servers) are bound to a region. Not every region provides the same infrastructure. During the setup process you will be asked to generate a key pair. This key pair is specific to a region and since we later are going to reserve resources that are not available in all regions, make sure you create the key for your region (For Germany: eu-west-1).
Follow all instructions at get set up for amazon ec2 and select your region when creating the key pair.
Run a virtual machine with GPU
As soon as an instance is running, you will be charged an hourly cost. Typically, the hourly cost will be below 1 USD. Make sure to terminate your session(s) when done. The virtual machine with GPU will play the role of the U-Net server.
We will use a spot instance, which is a temporary instance that will be at your disposal as long as the market price is below a threshold set by you. Unlike spot instances, the regular on-demand instances have a fixed price and can be paused. However, no on-demand instances are available to new AWS users, thus we use spot instances for this procedure. Follow the instructions in using spot instances request to launch a spot instance. First, change to region EU (Ireland). Choose g2.2xlarge as instance type and ami-0d77397e (Ubuntu 16.04) as root image. Note, that above AMI will only work in region eu-west-1. When starting from another region, select a comparable AMI type for your region.
Connect to your EC2 instance
Once the spot instance is running, log on to the instance as described at ec2 connect to instance linux and copy the IP address of your running EC2 instance to your clipboard or write it down. The username is ubuntu and the authentication is done by the saved key. The way to connect depends on your operating system.
Run caffe_unet setup
Once you are logged in, run following commands:
cd ~
wget http://developer.download.nvidia.com/compute/cuda/repos/ubuntu1604/x86_64/cuda-repo-ubuntu1604_8.0.61-1_amd64.deb
sudo dpkg -i cuda-repo-ubuntu1604_8.0.61-1_amd64.deb
sudo apt-get update
sudo apt-get install -y cuda-8.0 unzip
sudo apt-get clean
wget https://lmb.informatik.uni-freiburg.de/lmbsoft/unet/caffe_unet_package_16.04_gpu_no_cuDNN.zip
unzip caffe_unet_package_16.04_gpu_no_cuDNN.zip
echo "export PATH=$PATH:/home/ubuntu/caffe_unet_package_16.04_gpu_no_cuDNN/bin" | cat - ~/.bashrc > tmp
echo "export LD_LIBRARY_PATH=$LD_LIBRARY_PATH:/home/ubuntu/caffe_unet_package_16.04_gpu_no_cuDNN/lib:/home/ubuntu/caffe_unet_package_16.04_gpu_no_cuDNN/extlib:/usr/local/cuda-8.0/lib64" | cat - tmp > ~/.bashrc
Use U-Net Client
While the EC2 instance is running, follow the section Frontend (Client) Setup further below. On your local client computer enter the IP address of your EC2 instance, choose ubuntu as user name and choose the private RSA key specified earlier.
Save Snapshot for Future Use (Optional)
IMPORTANT NOTE: Storing a snapshot of your image will cost approximately 0.05 dollars per month per GB. The proposed image has a size of 16GB, thus will cost 0.4 dollars per month to be stored. Saving a snapshot allows re-starting the U-Net server instance later and skip the configuration steps. Follow ebs creating snapshot to get instructions on how to save a snapshot.
In order to start an instance based on a snapshot, it needs to be converted to an AMI (subsection Creating a Linux AMI from a Snapshot).
Terminate instance
IMPORTANT NOTE: You will be charged for each hour that your instance is running, regardless whether you are interacting with it or not. To terminate the instance follow the instruction in terminating instances.
Setup on own server (using pre-built binaries)
We recommend using the current Ubuntu 16.04 on a computer with a compatible GPU with at least 4GB of vRAM. The tutorial will assume the use of Ubuntu 16.04. If you don't have a gpu replace "gpu" with "cpu" and skip the installation of CUDA.
We describe the setup process for the fictional user "unetuser" who wants to install the caffe U-Net backend in the directory "/home/unetuser/u-net" on host "unetserver". He runs both backend and frontend on the same machine with ubuntu 16.04 and a GTX 980M GPU with 8GB.
Installation of CUDA 8.0
Download the CUDA 8.0 library:
cd /tmp
wget http://developer.download.nvidia.com/compute/cuda/repos/ubuntu1604/x86_64/cuda-repo-ubuntu1604_8.0.61-1_amd64.deb
sudo dpkg -i cuda-repo-ubuntu1604_8.0.61-1_amd64.deb
sudo apt-get update
sudo apt-get install -y cuda-8.0 unzip
sudo apt-get clean
rm cuda-repo-ubuntu1604_8.0.61-1_amd64.deb
cd ~
Set the environment by adding the following line to the top of your .bashrc
export LD_LIBRARY_PATH=$LD_LIBRARY_PATH:/usr/local/cuda-8.0/lib64/
Installation of the U-Net package
Download caffe_unet_package_16.04_gpu_no_cuDNN.zip to /home/unetuser, unpack it and rename the unpacked folder to u-net.
cd /home/unetuser
unzip caffe_unet_package_16.04_gpu_no_cuDNN.zip
mv caffe_unet_package_16.04_gpu_no_cuDNN u-net
Edit your ~/.bashrc file to set up the environment for the caffe U-Net software:
export PATH=$PATH:/home/unetuser/u-net/bin
export LD_LIBRARY_PATH=$LD_LIBRARY_PATH:/home/unetuser/u-net/lib:/home/unetuser/u-net/extlib
Test, if it works: start a new shell and execute
caffe
A usage message should appear on the screen.
Test whether execution over ssh works:
ssh localhost caffe
A usage message should appear on the screen.
Setup on own server (from source)
Building from source gives you you the greatest flexibility in choosing hardware (GPU) and software components (OS, CUDA, cuDNN). The sources were tested on Ubuntu 16.04/18.04 with CUDA Toolkits 8/9/10 and matching cuDNN versions. Remark: When building for CUDA 10 you will need a more recent version of CMake than the one provided in the Ubuntu repos. caffe_unet should work with other Linux operating systems, but without guarantees. The following set of commands assumes that you are running an Ubuntu machine with pre-installed CUDA Toolkit and cuDNN.
We describe the setup process for the fictional user "unetuser" who wants to install the caffe U-Net backend in the directory "/home/unetuser/u-net" on host "unetserver". He runs both backend and frontend on the same machine with ubuntu 16.04 and a GTX 980M GPU with 8GB.
Install required dependencies.
sudo apt-get install -y wget git unzip build-essential cmake libboost-system-dev libboost-thread-dev libboost-filesystem-dev libprotobuf-dev protobuf-compiler libhdf5-serial-dev libatlas-base-dev libgoogle-glog-dev
Clone the BVLC master branch of caffe to /home/unetuser and checkout revision d1208dbf313698de9ef70b3362c89cfddb51c520 as base for applying our caffe_unet patch.
cd /home/unetuser
git clone https://github.com/BVLC/caffe.git
cd caffe
git checkout 99bd99795dcdf0b1d3086a8d67ab1782a8a08383
Download and apply our caffe_unet patch.
wget https://lmb.informatik.uni-freiburg.de/lmbsoft/unet/caffe_unet_99bd99_20190109.patch
git apply caffe_unet_99bd99_20190109.patch
Configure and build caffe_unet. Adapt the CUDA_ARCH_BIN and CUDA_ARCH_PTX options to match the compute capability of your GPU. The given setup builds caffe_unet for MAXWELL and PASCAL GPUs and installs it to /home/unetuser/.local. Building for multiple compute capabilities is useful if you want to run caffe_unet on different computers with different hardware.
mkdir x86_64
cd x86_64
cmake -DCMAKE_BUILD_TYPE=Release -DCMAKE_INSTALL_PREFIX=/home/unetuser/u-net -DUSE_OPENCV=OFF -DUSE_LEVELDB=OFF -DUSE_LMDB=OFF -DBUILD_python=OFF -DBUILD_python_layer=OFF -DCUDA_ARCH_NAME=Manual -DCUDA_ARCH_BIN="20 30 35 50 60 61" -DCUDA_ARCH_PTX="35" ..
make -j install
Edit your ~/.bashrc file to set up the environment for the caffe U-Net software:
export PATH=$PATH:/home/unetuser/u-net/bin
export LD_LIBRARY_PATH=$LD_LIBRARY_PATH:/home/unetuser/u-net/lib
Test, if it works: start a new shell and execute
caffe_unet
A usage message should appear on the screen.
Test whether execution over ssh works:
ssh localhost caffe_unet
A usage message should appear on the screen.
Frontend (Client) Setup
- (optional) Check, if you can connect to the server and execute a program there:
- install ssh and a terminal program if you don't have one
- open the terminal program
- type "ssh unetuser@unetserver caffe" where you replace unetserver with the hostname or IP-Address of your server
- it should ask you for your password
- a usage message should appear
- Installation of the Fiji U-Net plugin.
- Install Fiji from http://www.fiji.sc.
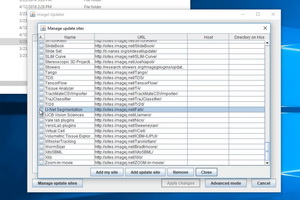
- Start FiJi and go to Help->Update...->Manage update sites
- Select "U-Net Segmentation" update site
- Add update site->Close->Apply Changes (then restart FiJi)
The plugin needs to be installed on the client computers only. It has no included segmentation capabilities, instead it interfaces existing caffe installations on the local machine or a backend server that is accessible via secure shell (ssh) and secure file transfer (sftp).
Using the FiJi U-Net Segmentation plugin with the pretrained 2D cell segmentation model
Walk-through example
Download caffemodels.zip and sampledata.zip which contain the pre-trained U-Net models and all datasets used in this walk through example and the video tutorial.
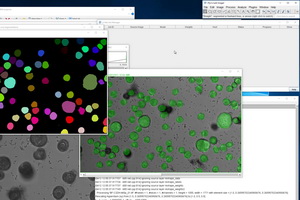
- Open a gray valued image, e.g. sampledata/BF-Microspores/BF-C2DH-MiSp_01.tif
- Setup a new segmentation with Plugins⇨U-Net⇨U-Net Segmentation Manager⇨Segmentation
Model: 2D Cell Net (v0)* Weight file: cellnet/caffemodels/2d_cell_net_v0.caffemodel.h5 Process Folder: cellnet Use GPU: GPU0 Memory (MB): 8000 Host: unetserver Port: 22 Username: unetuser Password: ******** Averaging: None *see below how to select the Folder to chose Model from
- Click "OK"
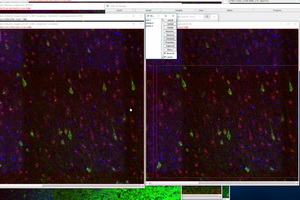
Segmentation progress will be shown in a new row of the job table. After the caffe_unet binary on the backend server has finished, the "Cancel" button on the right will change to "Show". Click it to show the segmentation result.
U-Net Segmentation parameters
- Model:
- Use the "Select folder" icon on the right of the "Model:"-line to select the local folder containing the U-Net models (<n>d_cell_net_v0.modeldef.h5 files). Then select the model you want to use for segmentation in the combo box.
- Weight file: (Path on the backend server)
- The weight file contains the weights of the U-Net pre-trained for cell segmentation. When running the plugin for the first time, the weight file is not yet on the server. You will be asked to upload a local file to the specified location during plugin execution.
- Process folder: (Path on the backend server)
- During the segmentation process intermediate files will be created and stored in the given folder on the backend server running caffe_unet. These files are: the model definition, the normalized image data, and the segmentation result. After closing Fiji, these temporary files will be removed. You can leave this filed empty to use the current folder in local operation or the user home folder in remote execution mode.
- Use GPU:
- Select the GPU that is used for the segmentation. In CPU-only mode, select "None".
- Tiling Layout:
- Depending on the selected model, there are various options of defining the tiling layout. If available (which is the case for the 2D cell segmentation model) we recommend to use the "Memory (MB)" option with which you can define the available amount of memory on the GPU. The options "Tile shape (px)" and "Grid (tiles)" are always available and let you define the maximum tile size or the tiling layout. The given values are upper bounds and will be adjusted to appropriate network input sizes. "#Tiles" uses the given amount of tiles and automatically defines the tile shape for optimal performance. "#Pixels/Tile" let's you set the number of input pixels of each tile. See also "caffe_unet --help" for further details.
- Use remote host:
- Check this to use a backend server for segmentation. If you want to use the local machine for segmentation, please uncheck.
- Host:
- The hostname or IP address of the backend server on which caffe_unet is installed.
- Port:
- The SSH port of the backend server (Default is 22).
- Username:
- Your username on the backend server.
- Password:/RSA key:
- Your SSH password on the backend server or the RSA private key file you want to use for authentication.
- Averaging:
- Select rotate/mirror to apply the network multiple times on rotated/mirrored versions of the input image. The segmentation will be computed from the average softmax score from all orientations. Averaging can improve segmentation quality for complicated data.
- Keep original:
- If checked, the original image is retained, otherwise it is replaced by the normalized image in processing resolution.
- Output scores:
- If checked, the output scores of the network are output additionally to the binary segmentation masks. The output scores contain as many channels as there are classes. The segmentation can be obtained through the scores via a pixel-wise arg max operation over the channels. Scores are especially useful during training and fine-tuning to get an idea of the training progress.
- Output softmax scores:
- If checked, the output scores of the network after applying a softmax transformation are output additionally. The softmax is kind of a per-class soft-segmentation.
Troubleshooting
If using GPU acceleration, make sure the graphics card is being recognized. Execution of
nvidia-smi
should show a table indicating the NVIDIA GPUs installed on the system.
When logging in to the server, the command
caffe_unet
should display a usage message by caffe. The same usage message must also appear when you run the command with a non interactive shell from a remote server:
ssh user@backendserver caffe_unet
If in either case no usage message is shown, make sure the $PATH and $LD_LIBRARY_PATH environment variables are setup correctly and that your profile is loaded both for interactive and non-interactive shells. For Ubuntu this may require to create a file ~/.profile that contains the line "source ~/.bashrc". If .bashrc contains an expression such as
case $- in
*i*);;
*) return;;
esac
or
[ -z "$PS1" ] && return
all instructions after that line will be ignored, thus the specification of the environment variables must be placed before this expression. Ensure that no outputs to standard output are generated in your .bashrc in non-interactive mode, otherwise file upload/download via sftp fails!
The selected model file is uploaded to the backend server when starting the segmentation. The weights must already reside on the backend server at the given location. The process folder is created on the backend server on demand given sufficient user rights.